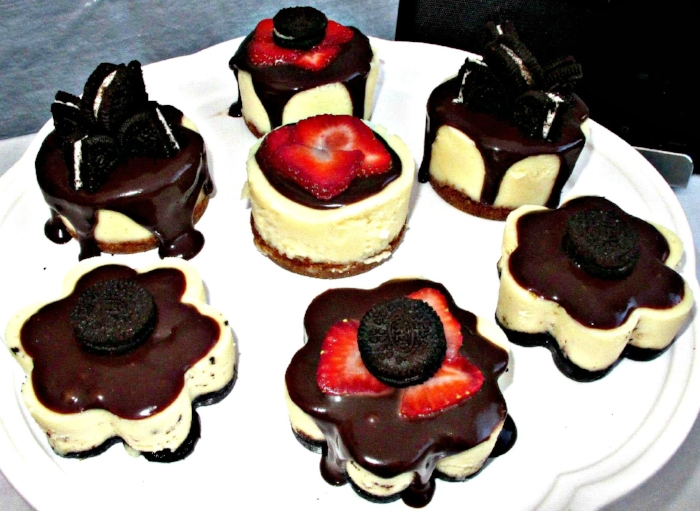
This post is WAY overdue. And although I wanted to have more step by step photos for my first recipe post, with how this pregnancy has been (those that follow me on social media know the deal!), who knows when I will be able to make that happen.
And I definitely wanted to get this out to you ASAP!
When I had my home baking business, Eat Bake Love, cheesecakes were something I always wanted to add to the menu. But due to at-home ingredients restrictions, it was not a possibility. However, these bad boys were a HIT at every single party we had or gatherings we brought them to.
And today, this holiday season, I wanted to give the inside scoop so that YOU can make them for all of your parties, gatherings and favorite people!
There are two ways I have made them over the years: one is with silicone molds and the other is with good old fashioned cupcake liners and cupcake pans. The latter proved to be the easiest and gave me a more consistent outcome each time, but I will share both techniques anyway.
Feel free to skip down to the recipe.
SILICONE MOLDS:
Some cheesecakes using the silicone molds. Look at those flowers! Hearts were a favorite too!
I have used a few different kinds of silicone molds, depending on how I want them to look. I've used these round ones , heart shaped ones, and flower shaped ones and you can easily get them from Amazon.com. With this method, I did use roasting pans and filled them with water to get a softer, creamier texture with the cheesecakes. I already had this one from my mom for when she makes turkey for Thanksgiving. But this would suffice too.
This technique, like I mentioned, was the harder way. Adding the water did give a more creamier texture; however, it was hard to pinpoint the proper timing for each mold to make sure it didn't overcook (hard and grainy) or undercook (too creamy and more like leche flan than cheesecake!)
And it wouldn't be the same each time! SO frustrating. It may have been my oven, it may have been that particular day of mixing, it may have been the amount of water I used...I don't know. All I know is that, I didn't have the time or energy to figure out what was making it so inconsistent. And when it would turn out over or undercooked...I'd get SO sad and frustrated because I spent the money, time and energy and did not have the time to make a new batch.
BUT, they looked absolutely stunning to not have any liners around it, and the fun shapes were, well, FUN! And CUTE!
So if you have the time to experiment and find what works best for you, go ahead and use this method.
My times always ranged from 31-45 minutes depending on the mold (crazy range, right?!), and I would use the method of "open the oven partially" around the 20 minute mark to again, increase the chances of getting that creamy texture and gauged if they were done depending on if the middle of the cheesecake was firm.
CUPCAKE PANS & LINERS (my now preferred method):
With this being the most consistent and easier method, I now use this one all the time. I can't do the fun shapes like before, but you can definitely customize with plain cupcake foil liners or more decorative ones like these. Just note that non-foil liners tend to lose the design a bit from the mix after they are baked.
Using my regular cupcake pan is so much easier now. You can use the same recipe below, and the time it takes me is 13 minutes, then I open and flip both pans and bake for another 12 more minutes, for a total of 25 minutes.
CUSTOMIZING CHEESECAKES:
For Hubby's Warrior Themed Birthday using the long toothpicks when I should have used the smaller ones
Another way you can customize is by sticking things onto the cheesecake like I did for the hubby's Warrior themed birthday above.
Of course, in hindsight, I probably should've used the shorter toothpicks and not the sandwich ones, because they were super tall! Lesson learned.
If customizing it that way is not something you want to do, you can always just use the colors of your party like I did with this photo below: blue and gold foil liners.
For another gathering that was Warrior Themed
Side note, sometimes the batter or the crust mix make more than the 24 cupcake-sized cheesecakes. In these cases, I use a mini cupcake pan and bake the remaining like the one pictured. They make for great cheesecake bites!
Okay, now finally on to the recipe!
Hope you enjoy! Drop a comment below and let me know if you make them or feel free to email me with any questions you may have!
Lots of Love,
Phoebe Grace
MINI WHITE CHOCOLATE CHEESECAKE RECIPE
For a printable version, click here.
*This crust, timing, and number of servings is for the cupcake pan and liner method
CRUST:
1/2 Cup of butter
2-3 rows of oreo cookie (About 306 grams)
**You can use honey graham crackers instead and add 1tsp of cinnamon if you prefer that flavor of crust.
WHITE CHOCOLATE CHEESECAKE:
24 oz of cream cheese (I use Kraft Philadelphia brand)
3/4 Cup of sugar
3 Tbsp of flour
3 Eggs at room temperature
8 oz of white chocolate (NOTE: I have experimented with other brands, and Nestle's turns out to have the best white chocolate flavor for this particular recipe.)
1/3 Cup of sour cream (I use Daisy brand)
1 Tsp of vanilla extract
1/4 Tsp of salt
(Optional) Extra oreo and fresh strawberries for toppings
GANACHE (for topping):
1/2 cup of heavy cream
3 oz of milk chocolate morsels
2 oz of semi-sweet chocolate morsels
DIRECTIONS:
For Crust:
1. Melt butter in a microwave safe bowl.
2. Crush the oreo with a food processor until it is all smooth with no more cookie lumps.
3. Add to butter bowl and mix well.
4. Add 1.5 tablespoons into each liner (or adjust to your liking).
For Cheesecake:
1. Pre-heat oven to 300 degrees.
2. Place together the cream cheese, sugar and flour in a mixing bowl and mix until light and fluffy.
3. Beat in eggs one at a time, mixing well after each egg. Once egg is mixed, it is important to stop mixing. You don't want to over mix. Scrape bowl as needed.
4. Melt 8 ounces of white chocolate. If chocolate is older and doesn't melt as easily, you may have to add oil to give it a more runnier consistency. After melted, mix into cream cheese mixture on low.
5. Continuing on low, mix in the vanilla, sour cream and salt. Scrape bowl as needed.
6. Use a 1/4 measuring cup to place into each liner.
7. Bake according to whichever method you choose from above- silicone or cupcake liner. Cupcake liner method is 13 minutes, flip both pans to maximize even baking, then bake for another 12 minutes. Remember, all ovens are different so you may have to experiment a bit and find what works best for you.
8. After it is baked, allow 1 hour to cool before placing in the fridge to chill for a few hours before serving. When you are ready to serve, allow cheesecakes to sit for at least 10 minutes to maximize creaminess.
ADDITIONAL NOTES: This recipe makes about 24 cupcake sized cheesecakes with sometimes a bit extra you can use to make mini bite sized cheesecakes. With each ingredient you are adding, be sure to not over mix and immediately stop once ingredients are incorporated well together.
For Ganache:
1. Add water to a small sauce pan on high heat and bring to a boil.
2. Place the chocolate and cream into a glass bowl.
3. Once pan is boiled, turn heat down to medium and place glass bowl on top so chocolate will begin to melt. (If it gets too hot, turn it lower.)
4. Continue stirring until chocolate is melted completely.
5. Let it chill in the fridge for about 30 minutes for a thicker consistency. Then you can add it to a piping bag or ziplock bag, snip the bottom, and decorate the cheesecakes as you like with strawberries, crushed or mini oreos or whatever other toppings you like!


